
Portfolio Project: Amechi Akpom
Setting Up and Managing Active Directory in Azure
In this demonstration, I walk through setting up a Windows Server domain controller in the cloud with Microsoft Azure. I also create a client virtual machine and connecting it to my domain.
I set up and configure the domain controller, ensuring connectivity between the client and the domain controller, and dive into the installation of Active Directory. I also create both admin and regular user accounts, connect my client to the domain, and establish remote desktop access for my non-admin users. I then add a few extra users to test out the client login.
When I’m done, I have a fully functional domain controller and client VM, complete with multiple user accounts and remote desktop access capabilities.
Video Demonstration
Environments and Technologies Used
Microsoft Azure: A cloud computing platform by Microsoft that provides virtual machines and other resources.
Resource Group: A logical container for resources deployed within an Azure subscription.
Virtual Machines (VMs): Virtualized computing resources that run operating systems and applications.
Windows Server 2022: A Microsoft server operating system used for the Domain Controller.
Windows 10: A Microsoft operating system used for the client machine.
Active Directory Domain Services (AD DS): A directory service for managing and organizing resources and user accounts within a domain.
Organizational Units (OUs): Containers within AD DS used to organize and manage objects such as users, groups, and computers.
Remote Desktop Protocol (RDP): A proprietary protocol by Microsoft that allows users to connect to a remote computer over a network connection.
PowerShell: A scripting and automation framework by Microsoft that is built on the .NET framework.
ICMPv4: Internet Control Message Protocol version 4 is used for error reporting and diagnostics in IPv4 networks, such as enabling the ping command.
DNS (Domain Name System): A hierarchical and decentralized naming system for computers and other resources connected to the internet or a private network.
List of Prerequisites
Microsoft Azure Account
Active Azure Subscription
Installation Steps
1. Set up Resources in Azure
In this section, we will create a Domain Controller VM (Windows Server 2022) named "DC-1" and a Client VM (Windows 10) named "Client-1" in Microsoft Azure.
Create the Domain Controller VM
In the Azure portal, click on "Create a resource."
Search for "Windows Server 2022" and select it.
Click "Create" to start configuring the VM.
Fill in the required information and name the VM "DC-1."
For the username, enter "dc_user."
Take note of the Resource Group and Virtual Network (Vnet) created during this process.
Click "Review + Create" and then "Create" to deploy the VM.

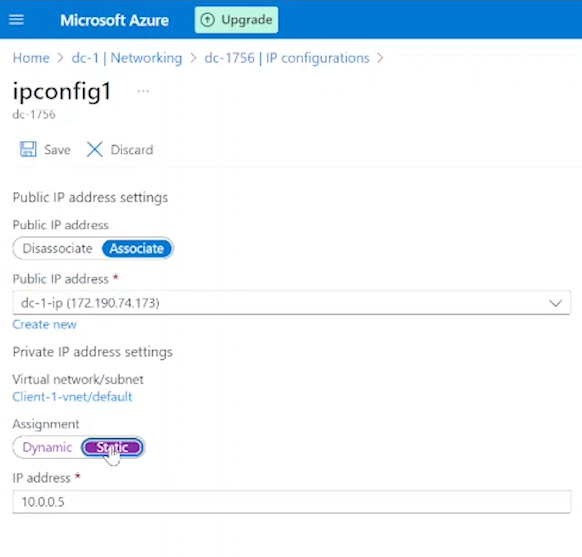
Set the Domain Controller's NIC Private IP Address to Static
In the Azure portal, select the "DC-1" VM.
Click "Networking" from the menu on the left.
Click on the link next to "Network Interface" to access the NIC settings.
Select "IP configurations" from the menu on the left.
Click on the Private IP listed as "(Dynamic)".
Toggle the switch from Dynamic to Static and click "Save."
Create the Client VM
In the Azure portal, click on "Create a resource."
Search for "Windows 10" and select it.
Click "Create" to start configuring the VM.
Fill in the required information and name the VM "Client-1."
For the username, enter "c_user."
Use the same Resource Group and Vnet created during the creation of "DC-1."
Click "Review + Create" and then "Create" to deploy the VM.

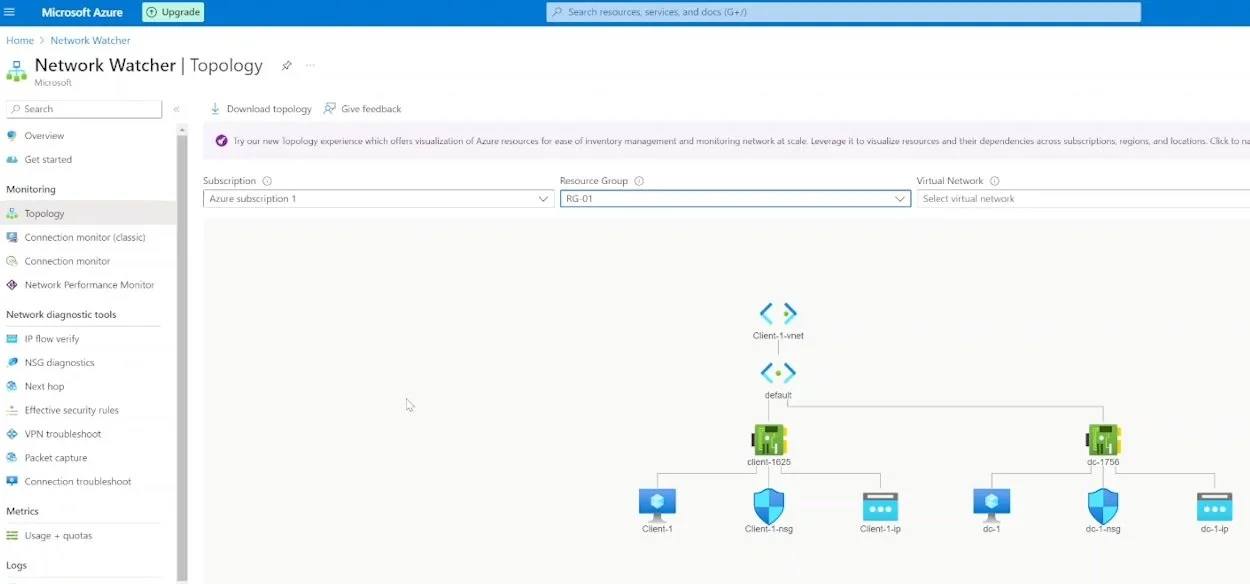
Verify Both VMs are in the Same Vnet
In the Azure portal, go to "Network Watcher."
Check the topology to ensure that both "DC-1" and "Client-1" are in the same Vnet.
2. Ensure Connectivity between the Client and Domain Controller
In this section, we will verify the connectivity between "Client-1" and the Domain Controller "DC-1" by using the ping command.
Log in to Client-1 using Remote Desktop
Find the public IP address of "Client-1" in the Azure portal.
Use Remote Desktop to connect to "Client-1" using its public IP address.
Open Command Prompt or PowerShell.
Ping the IP address of "DC-1"

Log in to the Domain Controller and Enable ICMPv4
Find the public IP address of "DC-1" in the Azure portal.
Use Remote Desktop to connect to "DC-1" using its public IP address.
Open Windows Defender Firewall by searching for it in the taskbar or by typing wf.msc.
Navigate to "Inbound Rules."
Sort the rules by protocol and locate the rules with the ICMPv4 protocol.
Find the "Core Networking Diagnostics - ICMP Echo Request (ICMPv4-In)" rules for both "private" and "domain" profiles.
Right-click on each rule and select "Enable Rule."

Check Connectivity on Client-1
Return to the "Client-1" Remote Desktop session.
Verify that the ping command is now successful and receiving replies from "DC-1."

3. Install Active Directory
In this section, we will install Active Directory Domain Services on the Domain Controller "DC-1" and set up a new forest.
Verify You're on the Domain Controller
Log in to "DC-1" using Remote Desktop, if not already logged in.
Open Command Prompt or PowerShell.
Type hostname and ensure the output is "DC-1."

Install Active Directory Domain Services
Open the "Server Manager" from the Start menu.
From the Server Manager Dashboard, click "Add Roles and Features."
Click "Next" until you see a list of services.
Select "Active Directory Domain Services" and click "Add Features."
Click "Next" and then "Install."

Promote DC-1 as a Domain Controller
In the upper right-hand corner of the screen, click the yellow caution icon indicating a notification.
Click the link that says "promote this server to a domain controller."
Select "Add a new forest."
Enter the Root Domain Name: newroot.com
Set the Directory Service Restore Mode (DSRM) Password to "Password1."
Click "Next" through the remaining steps, waiting for the provisioning process to complete.

Restart and Log Back into DC-1
If prompted to restart, do so. If not, manually restart "DC-1" once the configuration process is complete.
Log back into "DC-1" using Remote Desktop with the following credentials: newroot.com\dc_user
Confirm that the public IP address of "DC-1" has not changed.

Allow Time for Reconfiguration
Give the Domain Controller some time to finish reconfiguring.
Be patient as logging in may take a while.
4. Create an Admin and Normal User Account in Active Directory
In this section, we will create Organizational Units (OUs) and user accounts in Active Directory.
Create Organizational Units
Open "Active Directory Users and Computers" from the Windows Start menu.
Right-click on your domain (newroot.com) and select "New" > "Organizational Unit."
Name the Organizational Unit "_EMPLOYEES."
Repeat steps 2-3 to create another OU named "_ADMINS."
Right-click on newroot.com and select "Refresh." Both OUs should now be visible in the list.

Create a New Admin User Account
Click on the "_ADMINS" OU in the left menu.
Right-click inside the right window and select "New" > "User."
Fill out the "New Object - User" form:
First Name: Babs
Last Name: Gordon
User logon name: babs_admin (@newroot.com)
Uncheck "User must change password at next logon."
Check "The password never expires."

Add dc_user to the "Domain Admins" Security Group
Right-click on "Babs Gordon" in the right window and select "Properties."
Click the "Member Of" tab and then click "Add."
Type "domain" in the "Enter the object names to select" text box and click "Check Names."
Select "Domain Admins" and click "OK."
Click "Apply" and "OK."

Verify the User and Computer
Log out of the Remote Desktop connection to "DC-1" and log back in using the "newroot.com\dc_user" account.
Open Command Prompt and type the following commands:
whoami (It should display "mydomain\dc_user.")
hostname (It should display "DC-1.")
Type exit to close Command Prompt.
5. Join Client-1 to Your Domain (newroot.com)
In this section, we will join Client-1 to the newroot.com domain.
Login to Client-1
Login to Client-1 using Remote Desktop and its Public IP address with the original local admin account.
Confirm the user and computer using Command Prompt by typing whoami and hostname.
Type ipconfig /all in Command Prompt to check the DNS Servers. It should display a Public IP address.

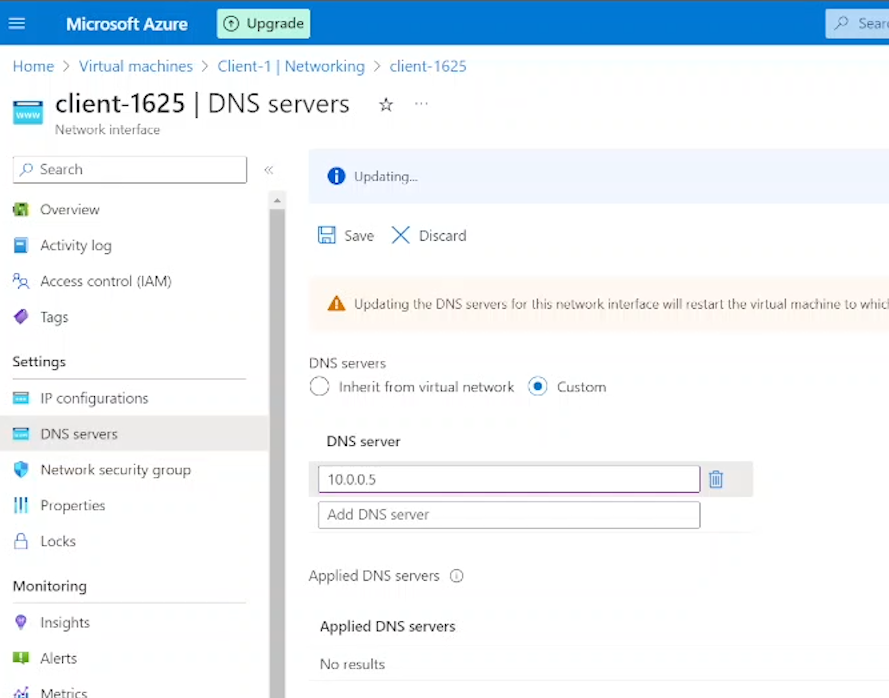
Set Client-1's DNS Settings
From the Azure Portal, confirm DC-1's Private IP address from its VM page under "Networking."
Open the VM page for Client-1, select "Networking," and click on the Network Interface link.
In the new window, click on "DNS Servers" under the Settings header in the left menu. Choose "Custom."
Enter DC-1's Private IP address into the "DNS server" field and click "Save."
Restart Client-1 from the Azure portal by going to its VM settings page and clicking on the "Restart" link.
Login to Client-1 and Verify DNS Settings
Use Remote Desktop to log into Client-1 using its Public IP address and Client-1 credentials.
Open Command Prompt and execute the commands whoami, hostname, and ipconfig /all.
Verify that the DNS Servers now show DC-1's Private IP address instead of the previously displayed Public IP address.

Connect Client-1 to the Domain
Right-click the Windows Start button and select "System."
Click "Rename this PC (advanced)" and then the "Computer Name" tab.
Click "Change…" and select the "Domain" radio button.
Enter "newroot.com" and click "OK."
A window will open asking for a user with admin privileges. Login with "newroot.com\dc_user."
Close all windows and restart Client-1.

6. Set Up Remote Desktop for Non-Administrative Users on Client-1
In this section, we will enable Remote Desktop access for non-administrative users on Client-1.
Log in and Open System Properties
Log into Client-1 as newroot.com\dc_user using Remote Desktop.
Right-click on the Start menu, select "System," and then click "Remote Desktop" on the right.

Add Domain Users to Remote Desktop Users
Under "User Accounts," click "Select users that can remotely access this PC."
Click "Add."
Under "Enter object names to select," type "domain users," click "Check Names," and then click "OK."
Now, non-administrative users can log into Client-1 remotely.

Check Active Directory Users on DC-1
Using Remote Desktop on your local device, connect to DC-1 with Babs Gordon's credentials.
Open Active Directory Users and Computers (ADUC).
Navigate to newroot.com > Users > Domain Users > Members Tab. You should see all users with access.

7. Create Additional Users and Test Login on Client-1
In this section, we will create multiple users, test login to Client-1, and simulate unlocking an account and resetting a password.
Create Additional Users
Log in to DC-1 as dc_user.
Open PowerShell ISE as an administrator (search for PowerShell ISE, right-click, and select "Run as Administrator").
Create a new file and paste the contents of the script written by Josh Madakor (lotated at https://github.com/joshmadakor1/AD_PS/blob/master/Generate-Names-Create-Users.ps1). The script creates additional users.
Run the script.

Verify New Users
Open Active Directory Users and Computers (ADUC).
Refresh the _EMPLOYEE OU and observe the new accounts.

Log in to Client-1 with a New User Account
Sign out of Client-1 if logged in.
Log in to Client-1 with a new user account (e.g., newroot.com\bow.pah) and password "Password1."
