
Portfolio Project: Amechi Akpom
Managing Network File Shares and Permissions in Microsoft Azure
In this demonstration, I navigate the steps of establishing Network File Shares and Permissions using virtual machines in Microsoft Azure. I create sample file shares, with varying permissions, and then put them to the test by trying to access them as an everyday user. I then craft a "LEGAL" Security Group dedicated to managing access to a distinct folder. By the end, I paint a broad picture of managing file shares and permissions in a Microsoft Azure setting.
Video Demonstration

Environments and Technologies Used
Microsoft Azure: A cloud computing platform by Microsoft that provides virtual machines and other resources.
Remote Desktop: A technology that allows users to access and control a computer or device from a remote location, as if they were physically present.
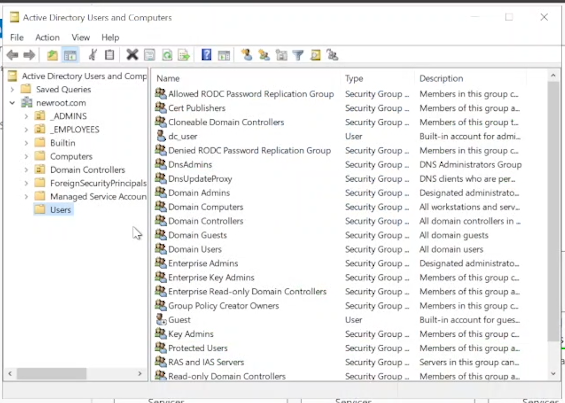
Active Directory (AD): A Microsoft technology used to manage and organize users, computers, and other network objects within a domain. It is essential for managing permissions and access to resources in a Windows-based network environment.
Active Directory Users and Computers (ADUC): A Microsoft Management Console (MMC) snap-in that provides a centralized interface for managing users, groups, and computers in an Active Directory domain.
File Sharing: A process that enables users to share files and folders with other users over a network. In this tutorial, we utilize the Server Message Block (SMB) protocol, which is a network file sharing protocol that allows applications to read and write to files and to request services from server programs in a computer network.
Windows Explorer: A file manager application included with the Windows operating system that provides a graphical interface for accessing the file systems.
Security Groups: A collection of users in Active Directory that are granted specific access rights and permissions to resources, such as file shares.
Create some sample file shares with various permissions
In this section, we will create sample file shares with various permissions on the Domain Controller (DC-1) and set the appropriate permissions for the "Domain Users" group.
Connect to DC-1 using your domain admin account (newroot.com\babs_admin).
On DC-1, locate the username and password for one of the random users created during the previous lab. To do this, follow these steps:
Open the Windows Start Menu.
Go to Windows Administrative Tools.
Click on Active Directory Users and Computers. A window will pop up.
In the Active Directory Users and Computers window:
Navigate to newroot.com > _EMPLOYEES.
Choose one of the employees and double-click to open a new window.
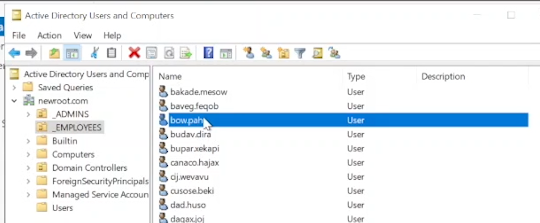
In the opened window, go to the Account tab and copy the User logon name (in this example, we use "bow.pah").
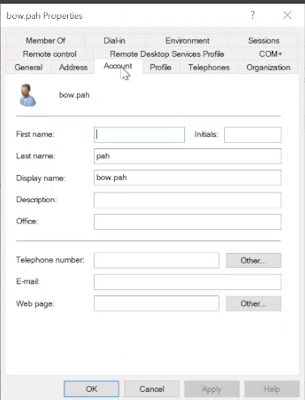
Write down bow.pah's logon credentials for later use.
Connect to Client-1 as a normal user (mydomain\bow.pah) with the password "Password1".
On DC-1, create 4 folders on the C:\ drive named: "read-access", "write-access", "no-access", and "Legal".

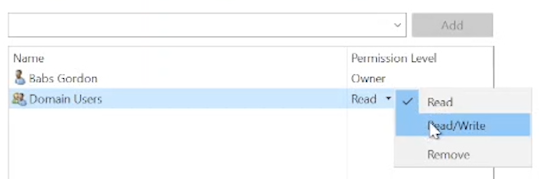
Set the following permissions (share the folder) for the "Domain Users" group on each folder:
Folder: "read-access", Group: "Domain Users", Permission: "Read"
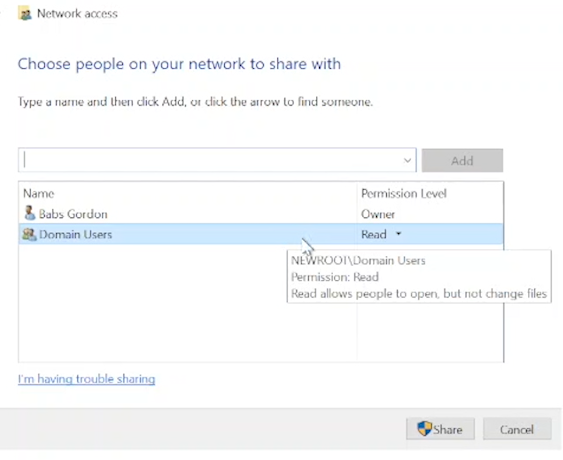
Right-click on the folder > Properties > Sharing tab > "Share…" button > a window pops up.
In the field, type "domain users" > click the "Add" button > choose "Read" from the "Permission Level" drop-down menu > click the "Share" button > click "Done" > close the window.
Folder: "write-access", Group: "Domain Users", Permissions: "Read/Write"
Folder: "no-access", Group: "Domain Admins", Permissions: "Read/Write"
Right-click on the folder > Properties > Sharing tab > "Share…" button > a window pops up.
In the field, type "domain admins" > click the "Add" button > choose "Read/Write" from the "Permission Level" drop-down menu > click the "Share" button > click "Done" > close the window.
Attempt to access file shares as a normal user
In this section, we will access the file shares created in the previous section using a normal user account on Client-1.
On Client-1, open the Command Prompt and us the hostname and whoami commands to verify your current user and computer name:
Open Windows Explorer and access the shared folders on DC-1:
In the address bar, type \\dc-1 and press Enter. A window will open displaying the shared folders.

Try to access the folders "read-access", "write-access", and "no-access" that you created in the previous section.
Attempt to add a text file to each of the three folders. Note the results, which should align with the permissions you set up in the previous section.
Switch back to DC-1 and access the folders as an admin.
On DC-1, create a new text file in each of the three folders ("read-access", "write-access", and "no-access").
Go back to Client-1 and check if you can view and edit the new text files created by DC-1 in each folder. Make note of the results.

Create a "LEGAL" Security Group, assign permissions, and test access
In this section, we will create a "LEGAL" Security Group in Active Directory, assign permissions to the "Legal" folder, and test access using the bow.pah user account.
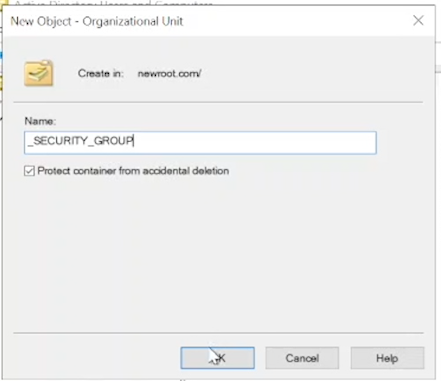
On DC-1, open Active Directory Users and Computers to create a security group called "LEGAL":
Right-click "newroot.com" > New > Organizational Unit.
Name the OU "_SECURITY_GROUPS".
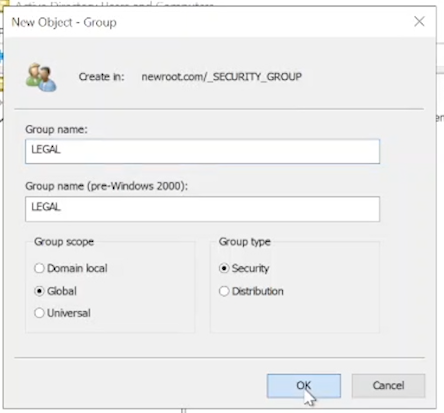
Once created, create the "LEGAL" group:
Right-click on _SECURITY_GROUP > New > Group.
Name the group "LEGAL", set Group Scope to "Global", and Group Type to "Security".
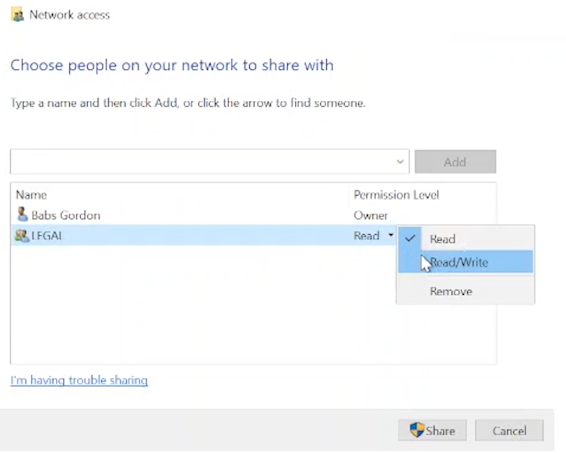
Go back to the "Legal" folder on the C-Drive of DC-1 and set the following permissions:
Right-click on the folder > Properties > "Sharing" tab > "Share" button.
In the field, type "LEGAL" > click "Add".
Set the permission level to "Read/Write" > click "Share" > click "Done" > close the window.
On Client-1, while logged in as bow.pah, attempt to access the "LEGAL" folder. It should fail.
The folder can be found by typing \\dc-1 in the Windows Explorer address bar.
Log out of Client-1 as bow.pah.
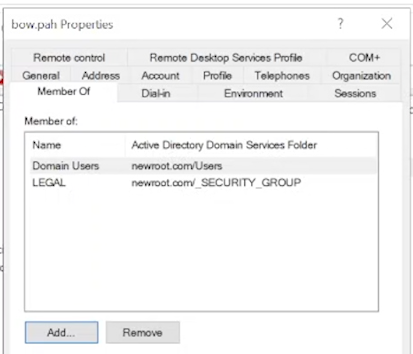
On DC-1, make bow.pah a member of the "LEGAL" Security Group:
Open Active Directory Users and Computers.
Navigate to newroot.com > _SECURITY_GROUPS.
Double-click on "LEGAL" on the right side. A window will pop up.
Go to the "Members" tab > click "Add" > enter bow.pah's username > click "Check Names" > click "OK" > click "Apply" > click "OK".
Sign back into Client-1 as bow.pah and try to access the "Legal" share in \\DC-1\.